As CNC machinists, we apply our skill, knowledge and experience to manufacture the best looking and most accurate parts that we can. We take a great deal of pride in the products that we produce, and we want others to see that pride in the finished product. But what do we do when we aren’t getting the results that we want? When dimensionally the parts meet blueprint specifications, but the surface finish and overall appearance is less than desirable? When this happens, we need to go back to the basics and ensure that we are using the best machining practices that we know to be correct.
We need to take a look at things like workholding to be sure it is solid and isn’t promoting harmonic issues or vibration during the machining process. We need to ensure that we are not using unnecessarily long tooling that can deflect easily or increase the chances of chatter. In high-speed processes, we need to be sure we are using quality, balanced tooling that has been rated for the programmed RPM being used. But what do we do if all of the things mentioned above are good?
Consider these options:
1. Control the Chip
Chip evacuation is a key component to producing a good surface finish. Controlling the chip is probably the first thing that you should consider. If the chips produced are making contact with the workpiece during the machining process, or if you are re-cutting chips, chances are it is affecting your surface finish in a negative way. Consider the possibility of changing the style of chip-breaker that you are using to help break up the chips for better control.
Although the use of air and coolant are both good choices for controlling chip evacuation, be careful with coolant. Coolant should be avoided in interrupted cuts. Thermal cracking of the cutting edges will occur due to the intermittent heating and rapid cooling of the cutting edge and will cause the insert to fail prematurely, or at the very least begin to affect your surface finish as the over-stressed cutting edge chips and fails.
2. Increase Your Speed
This is especially true when using carbide cutting tools. Increasing the speed will ensure that the material is in contact with the tool tip for a shorter period of time, reducing the edge buildup on the tool, which can cause poor surface finishes. Increasing the rake angle of the cutting tool will also help to reduce and control edge buildup.
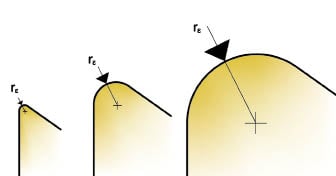
3. Use the Correct Tool Nose Radius
A larger tool nose radius (TNR) will be able to accommodate faster speeds. Inserts are capable of feeding at approximately one half the TNR per revolution and still produce good results. If this TNR-to-IPR ratio is exceeded, the tool will create more of a thread-like surface finish and not the shiny smooth finish that you desire. Therefore, the larger the TNR, the faster the feedrate it can accommodate and still produce the desired results. HOWEVER, using very large TNRs can produce chatter due to the increase in cutting pressures, so be careful and consider the speeds required for the materials that you are cutting. Use a tool with the TNR that fits your needs.
It is also worth mentioning that the use of a larger TNR will mean that you must leave more material for your finish pass. To ensure that the tool is behaving properly, you must leave equal to or more than the TNR for your finish tool to remove.
If you are experiencing chatter in the corners, then you might want to try a smaller TNR. Always use a TNR smaller than the corner radii that you are cutting so you are forming the necessary radius, especially on finish tools. This will help decrease cutting pressure and eliminate the chatter.
When milling, try a bullnose or ballnose endmill instead of a flat endmill. Something with a corner radius will give you a superior finish over a sharp corner and will definitely help increase your tool life.


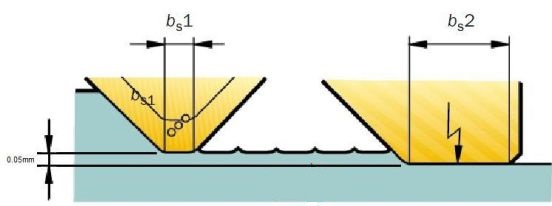
4. Try a Wiper Insert
A wiper insert has a small, flat area that is adjacent to the TNR. This flat actually wipes the finish smooth as the tool feeds along the workpiece and will help eliminate the thread-like finish that can occur with faster feedrates, which allows the use of smaller TNRs to help control chatter.
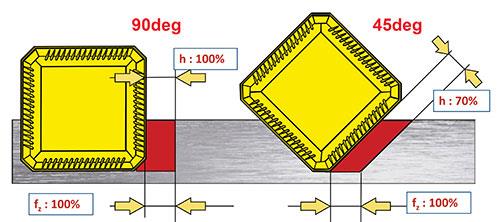
5. Increase the Cutter Lead Angle
Higher lead angles and positive-raked inserts produce a better surface finish than tools with a shallower cutting angle. For example, a facemill with a 45° cutting angle will produce a better surface finish than one with a 90° cutting angle.


6. Eliminate Dwells & Pauses
Every time a tool stops moving while in contact with the surface of the part, it will leave a mark. Change the process, if necessary, but do your best to ensure the tool never stops or hesitates during the cutting process.
You'll find more helpful resources, such as training videos and webinars, at Hurco Connect.

Don't forget to subscribe to the CNC Machining Blog! You'll receive an email notification whenever a new post is published.